CI/CD Hands-On: Build Your First Pipeline with GitHub Actions
A clean, minimal, end-to-end example you can actually run. We’ll write a tiny Python app, add a test, and wire up a real CI/CD pipeline that builds, tests, and “deploys” on every push.
Wondering what CI/CD actually is and wishing someone would just show you a working example? This is that example — small enough to follow in one sitting, real enough to teach you the pattern. Play with it, break it, and make it yours.
By the end of this walkthrough you’ll have a tiny Python app, a unit test, and a GitHub Actions pipeline that automatically builds and tests your code on every commit — and pretends to deploy it once the tests pass. That’s the whole CI/CD loop in miniature.
Files to Create
Build Steps
GitHub Account Needed
Servers to Manage
Prerequisites
You don’t need much to follow along. If you’re missing the Git basics, two short videos at the bottom of this list will get you there in a few minutes.
A GitHub account.
A little (very little) Python — enough to read a two-line function.
Basic Git terminology and commands: git init, git add, git commit, git push.
The Git client installed locally and your account ready to go.
No worries if the Git commands above are unfamiliar — these two short videos cover everything you need:
youtube.com/watch?v=USjZcfj8yxE
youtube.com/watch?v=y-an0v208A0
What Is CI/CD?
CI/CD = Continuous Integration + Continuous Delivery (or Deployment). It’s a DevOps pipeline that automates the three things every team does over and over again:
Turn your source code into a runnable, packaged artifact — automatically, every time.
Run your test suite on every change so bugs surface immediately, not in production.
Ship the result safely and quickly — with or without a human pressing the button.
CI, Delivery & Deployment
The acronym hides three distinct ideas. Here’s how they differ.
Continuous Integration (CI)
Developers merge code into the main branch frequently. Every commit automatically triggers a build, the automated test suite, static security testing (SAST), and linting or code checks.
Detect bugs early and prevent “integration hell” — the pain of merging weeks of divergent work all at once.
Continuous Delivery (CD)
After CI passes, the system packages the app, prepares the release, and then waits for a human approval before deploying.
Always be ready to deploy safely — the release is one click away whenever you choose to make it.
Continuous Deployment (CD)
The fully automated version: every good commit ships to production with no manual gate at all.
Every commit that passes the pipeline automatically reaches your users.
Build the Pipeline
Let’s build a tiny pipeline using GitHub Actions. We’ll create three files inside a local repo folder we’ll call cicd_tutorial, then push them to GitHub to trigger the workflow.
-
Create a Simple Python App
Create a file named
app.pywith a single function we can test.Python
app.pydef add(a, b):
return a + bprint(add(2, 3))
-
Add a Unit Test
Create
test_app.py. This is what CI will run automatically on every push.Python
test_app.pyfrom app import adddef test_add():
assert add(2, 3) == 5 -
Create the CI Workflow
Do this on your local machine. Inside
cicd_tutorial, create the file.github/workflows/ci.yml. GitHub looks in this exact folder for workflows.YAML
cicd_tutorial/.github/workflows/ci.ymlname: Simple CIon:
push:
branches: [ “main” ]
pull_request:
branches: [ “main” ]jobs:
build-test:
runs-on: ubuntu-lateststeps:
– name: Check out code
uses: actions/checkout@v3– name: Set up Python
uses: actions/setup-python@v4
with:
python-version: ‘3.10’– name: Install dependencies
run: pip install pytest– name: Run tests
run: pytest -qdeploy:
needs: build-test
runs-on: ubuntu-lateststeps:
– name: Deploy to server
run: echo “Pretend deploying to production…” -
Push It to Trigger the Pipeline
Back in your
cicd_tutorialfolder, commit and push. This is what kicks off GitHub Actions on your account.Bash
terminalgit add .
git commit -m “your message”
git push
What Happens Now: CI in Action
Head to the Actions tab in your GitHub account. Since this is a tutorial, the pipeline mimics real build and deploy steps — take a look at ci.yml to see exactly what runs.
From now on, whenever you push code or open a pull request, GitHub automatically runs the full sequence:
-
Pull Code
Checks out your latest commit into a fresh runner.
-
Install Python & pytest
Sets up the runtime and your test dependency.
-
Run Your Test
Executes
pytest -qagainst your code. -
Show a Green ✔ or Red ❌
Reports the result right in the Actions tab and on your commit.
A Small CD Example
The deploy step is already included in your ci.yml from Step 3 — it’s reproduced here for reference. In a real project you’d add a block like this after your CI job.
ci.yml — deploy job
needs: build-test
runs-on: ubuntu-latest
steps:
– name: Deploy to server
run: echo “Pretend deploying to production…”
The needs: build-test line is what makes this CD: the deploy job only runs if the tests pass. No green build, no deploy.
Visual Summary
The whole loop in one glance:
pipeline
→ CD (optional deploy to production)
What You’ll See in GitHub Actions
Once the workflow runs, the Actions tab gives you a live view of each job and step — green checks for passing stages, red for failures:
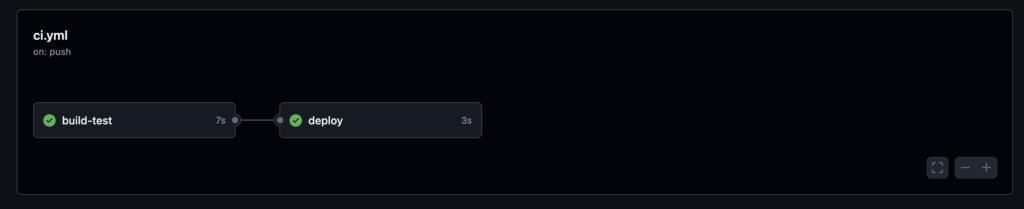
You just built a working CI/CD pipeline. Everything bigger — multi-stage deploys, environments, approvals, security gates — is the same pattern with more steps. Start here, then layer on as you need it.